Thursday, April 5, 2018

Lemon Blueberry Cupcakes

There are few things that speak to a person in flavors like summer as lemon and blueberry. When you combine those two flavors, for some reason I just can't think of anything but summertime. Picnics and hot afternoons. Bright and sweet and absolutely

The first time I made these, they weren't quite sweet enough and tasted more like muffins with delicious frosting on top. So I just had to remake them until they came out right - not that my roommates complained about eating more blueberry sweets, being the blueberry fanatics they were.


And then I did it. I made blueberry cupcakes that were sweet, fluffy, and just the right amount of tartness from the blueberries. I topped them with a delicious, silky, creamy lemon swiss buttercream. They were perfect for reminding me of summertime and all the good things about it.


Lemon Blueberry Cupcakes
Serving Size: 24 cupcakes

Cake Ingredients:

3 cups Flour
2 Tablespoons Flour
2 cups Sugar
3 teaspoons Baking Powder
1/2 teaspoon Salt
1/4 teaspoon Baking Soda
1/2 cup Butter, melted
2 large Eggs, room temp
1 cup Buttermilk
1 cup Milk
1 Tablespoon grated lemon rind
1 1/2 cup Blueberries (if using frozen, thaw them and drain the excess juice)

Frosting Ingredients:

6 large Egg Whites
1 1/2 cup Sugar
2 cups Powdered Sugar
3/4 cup Shortening, room temp
2 cups Butter, room temp
1/2 cup lemon juice
1/4 cup grated lemon rind

Blueberry Syrup:

2 cups Blueberry
1/2 cup Sugar
1/2 cup Water


Instructions:

1. Preheat oven to 350 degrees F. Line cupcake pan.

2. Combine butter and eggs into the mixing bowl. Mix together until well combined.

3. Mix in buttermilk, milk, and lemon rind into the liquid mix.

4. Add in flour, sugar, baking powder, salt, and baking soda. Mix until just combined.

5. Toss blueberries in the 2 Tablespoons of Flour. Fold into batter gently.

6. Scoop into cupcake liners 2/3 full and baked for 25 minutes.

7. Cool in pan 5 minutes until removing to cool completely.

8. For the frosting, over a double broiler, in a large metal bowl whisk together the sugar and egg whites constantly stirring until the sugar has dissolved completely and is no longer gritty to the touch.

9. Power this mix into a cool metal bowl and begin beating on high speed until thick, glossy and with stiff peaks.

10. Once stiff peaks are made, turn mixer onto low speed. Dump in all of the powdered sugar and begin beating until well combined.

11. Mix in both butter and shortening and beat until well combined and smooth.

12. Add in lemon juice and lemon rind, mixing until well combined.

13. Begin making your blueberry syrup by putting your blueberries, sugar and water in a medium saucepan and bring to a boil over medium-low heat.

14. Reduce heat and allow to simmer for about 10 minutes while stirring occasionally while smashing a few of the blueberries but not all.

15. Pour into a bowl, cover with plastic wrap and refrigerate until chilled, about 20 minutes.

16. Take one of your blueberries, frost with the lemon swiss buttercream and drizzle with some of your chilled blueberry syrup.

ENJOY!


Monday, April 2, 2018

Swiss Buttercream

I don't know about you but I had never heard of swiss buttercream before I started to get serious about cupcakes and extended myself to improve my recipes. But then I discovered and there was no way I was ever going back. Now I use swiss buttercream, in various flavors, on several of my cupcakes. I just can't resist.

Imagine if creamy, delicious butter cream had a love child with airy, divine meringue. That is what swiss buttercream is. It's absolutely amazing. Sweet, creamy, and decadent. You'll never have enough.


Ingredients:

6 large Egg Whites
1 1/2 cup Sugar
2 cups Powdered Sugar
3/4 cup Shortening, room temp
2 cups Butter, room temp
1 Tablespoon Vanilla


Instructions:
1. Over a double broiler, in a large metal bowl whisk together the sugar and egg whites constantly stirring until the sugar has dissolved completely and is no longer gritty to the touch.

2. Power this mix into a cool metal bowl and begin beating on high speed until thick, glossy and with stiff peaks.

3. Once stiff peaks are made, turn mixer onto low speed. Dump in all of the powdered sugar and begin beating until well combined.

4. Mix in both butter and shortening and beat until well combined and smooth.

5. Add in vanilla, mixing until well combined.


Sunday, April 1, 2018

Red Velvet Cupcakes

The perfect red velvet cake is hard to find and make in the kitchen. It's a perfect combination of sweet vanilla, bitter chocolate and tangy buttermilk. It's taken me forever to find a recipe of red velvet that gave me what I wanted and wasn't too much chocolate, or too much vanilla, or too dry, or a myriad of other things that can go wrong with a bad red velvet.


I have to say, this is probably one of my favorite cakes and I am not usually a huge red velvet fan. My friend, who absolutely would die eating red velvet if she could, ate six of them and I couldn't blame her. It was moist, with the right amount of sweetness and tanginess, and topped with the creamiest, most delicious cream cheese frosting. I cannot recommend this strongly enough for anyone who absolutely needs a decadent, delicious red velvet in their life.


Red Velvet Cupcake Recipe
Servings: 26 cupcakes

Cake Ingredients:

2 1/2 cup Flour
1/2 teaspoon Salt
1 Tablespoon Baking Soda
3 Tablespoon Cocoa Powder
1/2 cup Butter, room temp
1 1/2 cup Sugar
1/2 cup Sour Cream
3/4 cup Oil
3 large Eggs, room temp
2 teaspoons Vanilla
1/2 cup Buttermilk
2 Tablespoon Red Food Coloring
2 teaspoon White Vinegar

Frosting Ingredients:

8 cups Powdered Sugar
1/2 cup Butter, room temp
16 ounces of Cream Cheese
1 Tablespoon Vanilla


Instructions:

1. Preheat oven to 350 degrees F.

2. Cream together butter and sugar at high speed until fluffy. Add in sour cream and mix for another minute before adding in the oil and mixing for another minute.

3. Add in eggs, one at a time, beating the mixture well between each egg.

4. Add in buttermilk and vanilla, thoroughly mixing.

5. Mix in cocoa powder and red food coloring until well mixed.

6. Add in flour, salt, baking soda and vinegar in that order. Mix until just combined.

7. Scoop into cupcake liners, 3/4 the way full and bake for 23 minutes. Cool in pans for at least 5 minutes before removing to cool completely.

8. While cupcakes are baking, beat together cream cheese and butter for the frosting until creamy and fluffy.

9. Beat in vanilla and slowly start beating in powdered sugar one cup at a time until desired consistency.

10. ENJOY!!


Friday, March 16, 2018

Mocha Chocolate Cupcakes

I'm not a big coffee lover. I'm not the type of person who wakes up in the morning and zombie shuffles over towards a warm cup of joe. However, I do live with coffee lovers who can't function without that dark drink. So I decided that I would do a cupcake in honor of them and see if I could incorporate a way to do it so that I, and others who find chocolate just a bit too bitter, would enjoy it as well.

I FOUND SUCCESS.

I found it in a decadent chocolate espresso cake with a cream, sweetened coffee buttercream and just a delicious drizzle of homemade chocolate sauce. I cannot express how dreamy this cake was and almost made me a lover of coffee! I hope you feel the same!


Mocha Chocolate Cupcakes:
Servings 12

Cake Ingredients:

1 cup all-purpose flour
1 cup granulated sugar
1/2 cup cocoa
1 teaspoon baking powder
1/2 teaspoon baking soda
1/2 teaspoon salt
1/2 cup milk
1/4 cup vegetable oil
1 egg, room temperature
1/2 teaspoon vanilla
1/2 cup water, boiling
2 tablespoons strong coffee, cooled

Frosting Ingredients:

1/2 cup butter, softened
1/3 cup strong coffee, cooled
1 teaspoon vanilla
5-10 cups of powdered sugar

Chocolate Sauce Ingredients:

1/2 cup sugar
2 tablespoons cocoa
1/8 teaspoon salt
2 tablespoons butter
1/4 cup water
1/4 teaspoon vanilla extract


Directions:

1. Preheat oven to 325 degrees F and line your cupcake pan.

2. Add flour, sugar, cocoa, baking powder, baking soda and salt to a large bowl. Whisk to combine well.

3. Add milk, vegetable oil, egg, vanilla and coffee to the flour mixture and mix until well combined. Carefully mix in boiling water. Mix until well combined.

4. Evenly distribute batter into cupcake liners at 2/3 full. 

5. Cake batter will be very liquidy. That is normal. Place in oven and bake for 20 minutes.

6. Remove from oven and allow too cool completely while you make your frosting and chocolate sauce.

7. Put butter, vanilla, and coffee into mixing bowl. Beat together until creamy. 

8. Slowly mix in a cup of powdered sugar at a time until desired consistency.

9. For the chocolate sauce, add the ingredients to a saucepan. Stir together.

10. Bring to a boil, continually stirring until smooth. Boil for roughly 2 minutes.

11. Remove from heat and cool to room temperature.

12. Remove your cupcakes from the pan, top with coffee buttercream and drizzle with chocolate sauce.

ENJOY!!


Monday, March 12, 2018

Cookies and Cream Cupcakes

Sometimes, you just need chocolate and whipped cream to make your day. Cookies and Cream have always been a flavor I love in just about any form. Cookies, candy bars, ice cream and absolutely in cake. It's just the perfect amount of chocolate and sweet cream. So I decided that it was time to add this to the menu!

A deliciously moist, yet light chocolate cake topped with a creamy, silky, sweet homemade whipped cream that has been folded with crushed chocolate sandwich cookies and garnished with a half chocolate sandwich cookie.

Cookies and Cream Cupcake
Servings: 12 cupcakes

Cake Ingredients:

1 cup all-purpose Flour
1 cup granulated Sugar
1/2 cup Cocoa
1 teaspoon Baking Powder
1/2 teaspoon Baking Soda
1/2 teaspoon Salt
1/2 cup Milk
1/4 cup Vegetable Oil
1 Egg, room temperature
1/2 teaspoon Vanilla
1/2 cup Water, boiling

Frosting Ingredients:

1 1/2 cup Heavy Cream
1/2 cup Powdered Sugar
1 teaspoon Vanilla

6 chocolate sandwich cookies broken into halves
8 chocolate sandwich cookies, crushed to powder

Directions:

1. Preheat oven to 325 degrees F and line your cupcake pan.

2. Add flour, sugar, cocoa, baking powder, baking soda, and salt to a large bowl. Whisk to combine until combined well.

3. Add milk, vegetable oil, egg and vanilla to the flour mixture and mix together until well combined. Reduce speed and carefully add the boiling water to batter. Beat on high for about 1 minute.

4. Evenly distribute batter in cupcake liners, each should be about half full.

5. Cake batter will be very liquid. That is normal. Place in the oven and bake for 20 minutes.

6. Remove from the oven and allow to cool completely while you make your whipped topping.

7. Combine the powdered sugar, heavy cream, and vanilla in a chilled bowl. Beat with your mixer until the cream forms stiff peaks.

8. Dump in your crushed chocolate sandwich cookies and gently fold into your whipped cream. Do not overfold as it will make your frosting an ugly gray color.

9. Once your cupcakes have cooled completely, top with your infused whipped cream and garnish with a half chocolate sandwich cookie. 

ENJOY!!!! I know I did!!


Sunday, March 11, 2018

Homemade Whipped Cream

There are very few things in this world that compare to sweet, creamy and homemade whipped cream. It goes perfect on so many things and with so many things. Do you want it on your desserts? In your coffee? Or just to delightfully eat? The possibilities are endless. I personally prefer it on a several different types of cupcakes. Strawberry and Cream, Cookies and Cream, Blueberry Cream... I think you can guess the common theme running here!

I prefer my whipped cream a little stiffer, gently sweet, and just a hint of vanilla. If you too wish to enjoy such whipped cream, then this is the recipe for you! It's super simple and super delicious.

If you'd like a different flavor in y our whipped cream recipe, you can switch it out with the vanilla extract and even add a bit more if you think it's needed. Coconut rum and bourbon are substitutes that people frequently use.

Ingredients: 

1 1/2 cup Heavy Cream, cold
1/2 cup Powdered Sugar
1 teaspoon Vanilla


Directions:

In a large bowl, add your heavy cream, powdered sugar and vanilla. Start your mixer on low and then turn it to high. Well mix your ingredients until your whipped cream forms stiffer peaks. 

Be careful not to overbeat your whipped cream or it'll take on a texture of butter with a heavier flavor. It's still super tasty, however; it just isn't as silky or creamy. 

Once you've got the consistency you desire, top whatever you desire and devour it. ENJOY!


Thursday, March 8, 2018

Homemade Caramel Sauce - Easy

I've always, my entire life, used store-bought caramel sauce. Or even better, I cheated and melted those caramel candy squares with heavy whipping cream. (It never came out quite right.) I just thought that's how caramel worked and I would never be able to actually make caramel sauce like they do on fancy cooking shows. (Hello Cupcake Wars, I'm looking at you.)

However! After much trial and error, and a little input from my good friend, I have finally mastered the art of caramel making. I even did it simply so that others who are struggling with making caramel sauce on their own won't have to go through four batches before getting it right. (The first three were just so hard!)

I hope you enjoy!

Easy Homemade Caramel Sauce
Serving: About 1 Cup

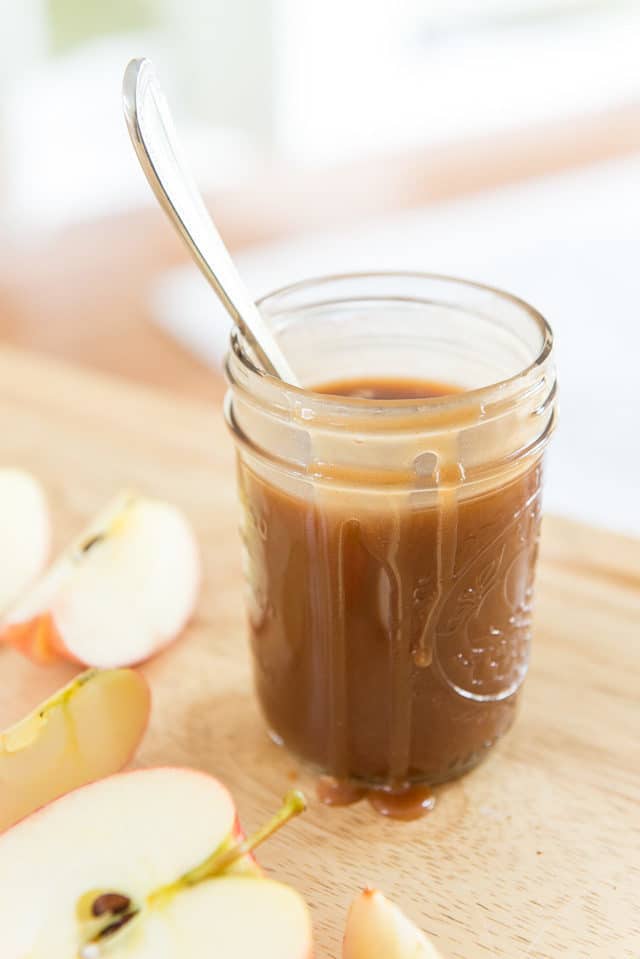
A Mason Jar Of Homemade Caramel Sauce with a Metal Spoon and Sliced Gala Apples On A Wooden Board

Ingredients:

1 cup Sugar
1/3 cup Water
2 Tablespoons Butter (I use unsalted)
3/4 cup Heavy Cream
1 teaspoon Vanilla (optional)

Instructions:

1. Add the sugar to the saucepan, then add the water to fully moisten the sugar.

2. Place the pan over medium heat and cool until the sugar dissolves and turns clear. It may take a few minutes.

3. Raise the heat to medium high and cook the caramel until it turns an amber color. Do NOT turn the heat to high because it will cause the caramel to seize and crystallize.

4. Turn the heat off and immediately add the heavy cream.

5. Add the butter and stir everything together until the caramel is smooth. If desired, add the vanilla extract.

6. Let the caramel sauce cool to room temperature nd then transfer to a jar to be refrigerated.

The caramel can be stored in the fridge for 1 month or in the freezer for 3 months.

NOTE!!

If you want to make a salted caramel, just add 1/2 teaspoon of salt at the end along with the vanilla extract.

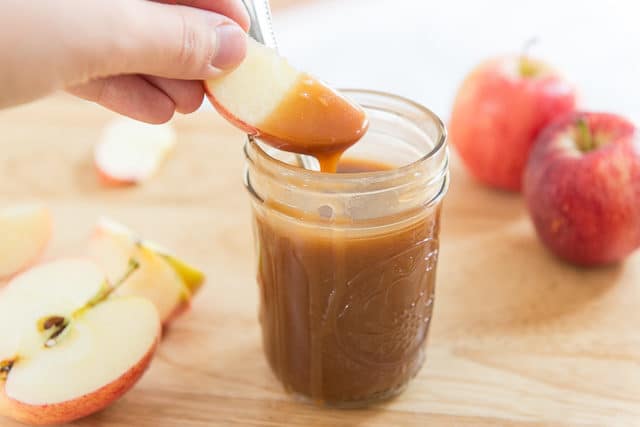
A Slice Of Gala Apple Dipped Into A Mason Jar Of Homemade Caramel Sauce

Wednesday, March 7, 2018

Carrot Cake Cupcakes

I have struggled for many years to find the PERFECT Carrot Cake recipe to use as cupcakes. A lot of the time it either has so many unnecessary ingredients (can we say RAISINS??) or it's super dry. I don't need to have my mouth feel like the Sahara Desert after eating a cupcake! After many years of trial and error, not to mention tears and kitchen battle scars, I have finally mastered a carrot cake recipe that's the trifecta of moist, simple and absolutely DELICIOUS.

Seriously. Carrot Cake is my favorite cake and I thought I'd go my entire life without ever having some that just made my day. I had to fend my friends off the last one so I could devour it whole. (Don't judge. I love cupcakes AND have a big mouth!)

They're a super moist, delectably simple carrot cake filled with spices, carrot, and a surprise of orange. Topped with a sweet, creamy, slightly tangy cream cheese frosting. Garnished with chopped and candied pecans!

They're everything you could possible want in a carrot cake without being dense, heavy or complicated in flavors.


Carrot Cake Cupcake Recipe
Servings: (I don't remember the exact amount, but it was well over 40.)

Cake Ingredients:

1 1/4 cups whole pureed orange
5 eggs, room temperature
1 cup vegetable oil
1/2 cups molasses
2 1/2 cups flour
2 1/2 cup brown sugar (I prefer dark, but have used light for delicious results)
1 Tablespoon Baking Powder
1 Tablespoon Baking Soda
1 Tablespoon Cinnamon
1 teaspoon of Nutmeg
1/2 teaspoon Salt
2 1/2 cups Grated Carrot

Frosting Ingredients:

8 cups of Powdered Sugar
1 cup Butter (I use salted but you can use unsalted), room temperature
16 oz. Cream Cheese, room temperature
3 teaspoons of Vanilla

Candied Pecans:

1/2 cup Sugar
1/2 cup Brown Sugar
1 Tablespoon Cinnamon
1 teaspoon Salt
4 Cups chopped or halved pecans (I prefer chopped because I can use leftovers for granola)
1 egg white
1/2 teaspoon vanilla
1 teaspoon water


Instructions:

1. Preheat your oven to 350 degrees. Place the pureed whole oranges and eggs into your bowl. Mix on high for 3-5 minutes. 

2. In a second bowl, mix your flour, baking powder, baking soda, cinnamon, nutmeg, and salt together. 

3. Slowly pour in your vegetable oil and molasses into the orange-egg mixture while continuing to mix on high speed. 

4. Turn your mixer down to low speed and add your dry ingredients into your wet ingredients. Scrape down the sides as you go. Once thoroughly combined, add your grated carrot.

5. Line your cupcake pan and fill 2/3 of the way full. Bake for 25-30 minutes or until an inserted toothpick comes out clean. Cool 10 minutes in the pan before removing to cool completely on oven rack.

6. While your cupcakes are cooling, beat cream cheese, butter and vanilla in a mixer until blended.

7. Add your powdered sugar one cup at a time until you have the consistency you desire. (I prefer mine a bit stiffer for frosting purposes.)

8. Once your cupcakes have been baked, lower your oven temperature to 300 degrees F. Line a large baking sheet with foil or parchment paper and set aside.

9. In a medium bowl, add both sugars, cinnamon, and salt. Whisk until combined and set aside.

10. In a large bowl, whisk the egg white, vanilla and water together until the mixture is super frothy. Add the pecans and gently toss until the pecans are well coated. 

11. Add your sugar mixture and toss until the pecans are super coated.

12. Spread the pecans out in a single layer on your baking sheet. Bake for about 45 minutes, mixing them around every 15 minutes so they cook evenly and don't burn. The sugar mixture will harden on the pecans.

Once everything has been baked and cooled, you can assemble your cupcakes. Take your cooled cupcake, frost with your divine cream cheese frosting, and then garnish with your candied pecans. ENJOY!


Tuesday, February 27, 2018

Strawberry Lemonade Cupcakes

It took me awhile to decide on which cupcake should be the first post in this blog, however; I decided upon one of my favorites that took me forever to create.

Strawberry Lemonade Cupcakes.

They taste like summer. A little sweet, a little tart, and absolutely delicious. If I could have these every week of the summer, I would!


They're a deliciously tart lemon cake base with chopped fresh strawberries inside. They're moist and that perfect cake texture. Topped with a sweet, fresh strawberry buttercream made with fresh strawberries. It's creamy and fluffy as a frosting. Garnished with a candied lemon slice that give it a tangy sweetness to tie it all together.

Tangy. Sweet. Tart. Everything I absolutely loved about strawberry lemonade only made better - IN CAKE FORM!

Strawberry Lemonade Cupcake Recipe
Serves: 16 cupcakes

Cake Ingredients:

1 cup (2 sticks) of unsalted butter, melted
1 cup granulated sugar
2 large eggs, room temperature
1-1/2 cups all-purpose flour
1 teaspoon baking powder
1/4 teaspoon salt
zest of 2 lemons
1/4 cup of lemon juice (the juice of the two lemons you just used for zest)
1/2 cup milk (I used whole milk)
6 strawberries, chopped

Frosting Ingredients:

1 cup (2 sticks) unsalted butter, softened
3 1/2 - 4 cups of powdered sugar
1/3 cup of strawberries pureed
1 tablespoon vanilla extract
2 tablespoons of milk

Lemon Slice Ingredients:

2 lemons, washed and sliced in thin slices
1 cup of granulated sugar
1 cup water

 Instructions:

1. Preheat oven to 350 degrees F. Line cupcake pan with liners and set aside.

2. In a large bowl, combine sugar and melted butter. Stir in eggs, one at a time, until well combined.

3. In a separate bowl, whisk together flour, baking powder, and salt. Stir dry ingredients into the wet ingredients. Add the lemon zest, lemon juice and milk. Stir until batter is smooth and creamy. Gently stir in chopped strawberries until just combined. Batter will be thick.

4. Divide batter into cupcake liners, filling about 2/3 of the way. Bake for 22-24 minutes or until a toothpick comes out clean when inserted into the center. Let cool in pan for 10 minutes before removing to cool completely.

5. Cream together butter, strawberry puree, vanilla and milk until well combined. 

6. Add powdered sugar one cup at a time, combining well after each cup, until frosting is the desired consistency. It is best where the frosting will hold its shape.

7. Combine sugar and water in medium sauce pan. Bring to a boil and boil until sugar is dissolved.

8. Add lemon slices and reduce to a simmer. Simmer until slightly translucent in color. (About 15-20 minutes).

9. Remove from heat and pull lemon slices out of the liquid, laying on a foil covered pan. 

10. Sprinkle with sugar and put into fridge until firm.

11. Once cupcakes are cooled, frost with strawberry frosting and topped with candied lemon slice.


Cupcakes and frosting are good for 3-4 days if put in air tight container and refrigerated.

ENJOY THEM!